Guides • Understanding Publishing
Posted on Aug 03, 2021
How to Record Your Own High-Quality Audiobook in 6 Steps
Recording your own audiobook is common among indie authors, especially for people who’ve self-published personal books like memoirs. While the best results come from working with professional narrators and producers, some authors may find it financially or creatively rewarding to carry out the process themselves.
The DIY route requires slightly more time and effort, especially when adopting new audio engineering skills. Here’s how to record an audiobook in six simple steps:
This post is for authors hoping to record their own books — if you're looking into narrating audiobooks as a career, head to our post on becoming an audiobook narrator instead!
1. Start by researching the audiobook production process
Before you start recording, you have to know the standards that your audiobook has to meet to be accepted by distributors. Aggregators and distributors are very particular about the audio standards that they require — and understandably so! They have to ensure consistency in the quality of audio they offer to avoid complaints and refunds. So let’s look at these requirements that your audiobook has to meet.
Technical requirements
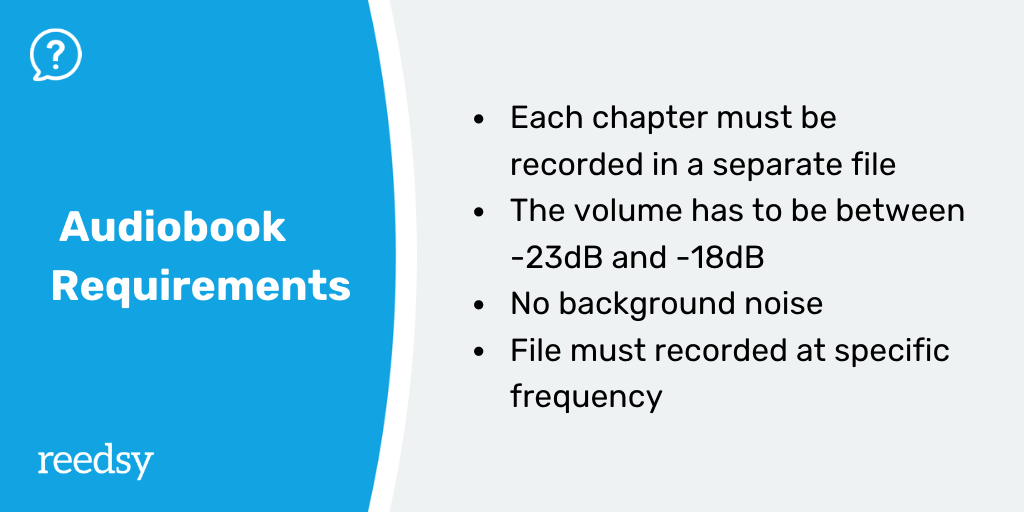
Technical guidelines published by aggregators ACX and Findaway Voices both agree that these are the essential requirements for every audiobook:
- Each chapter of your book has to be an MP3 file not exceeding 120 minutes;
- Each chapter must begin with a pause and then a header announcement (e.g., Chapter 1);
- All audio must fall between -23dB and -18dB;
- There should be minimal unwanted noises and distortions;
- The file should be recorded at a specific frequency and transmission speed for high audio quality.
These requirements are exacting, which means that the recording room and equipment you use must be up to professional standards. We’ll cover the technicalities of setting these up in the following steps.
Quality of narration
Just as important as the technical audio is the quality of your narration. An audiobook narrator shouldn’t simply read out the text; they should perform it with nuances and appropriate emphasis that best deliver the story or message of the book.
If you’ve listened to audiobook novels, you’ll know that narrators use different voices to act out the many characters in a story. This requires serious voice acting skills, which is why you rarely see fiction authors record their own books. Those who do, like Neil Gaiman, tend to have been trained in audio theatre beforehand.
As for nonfiction books, some authors do very well narrating their own books, especially when the book tells their personal stories. However, keep in mind that the most prominent examples of these audiobooks are public figures with speaking experience — like the Obamas, Tina Fey, and Trevor Noah. Those less accustomed to public speaking should still lean towards working with a professional narrator.
Try to honestly appraise your own ability to tell stories vocally before deciding to record your own audiobook. The best way to check this is to read to someone else (a voice actor, if possible) and get their feedback first before committing.
2. Secure a studio to record audio
Now that we’ve carefully pinned these standards to the corkboard of our minds, let’s move on to the actual setup. You’ll first need to secure a space in which to record your book. There are two options for indie authors: building an at-home studio or renting a professional space.
Creating a studio at home
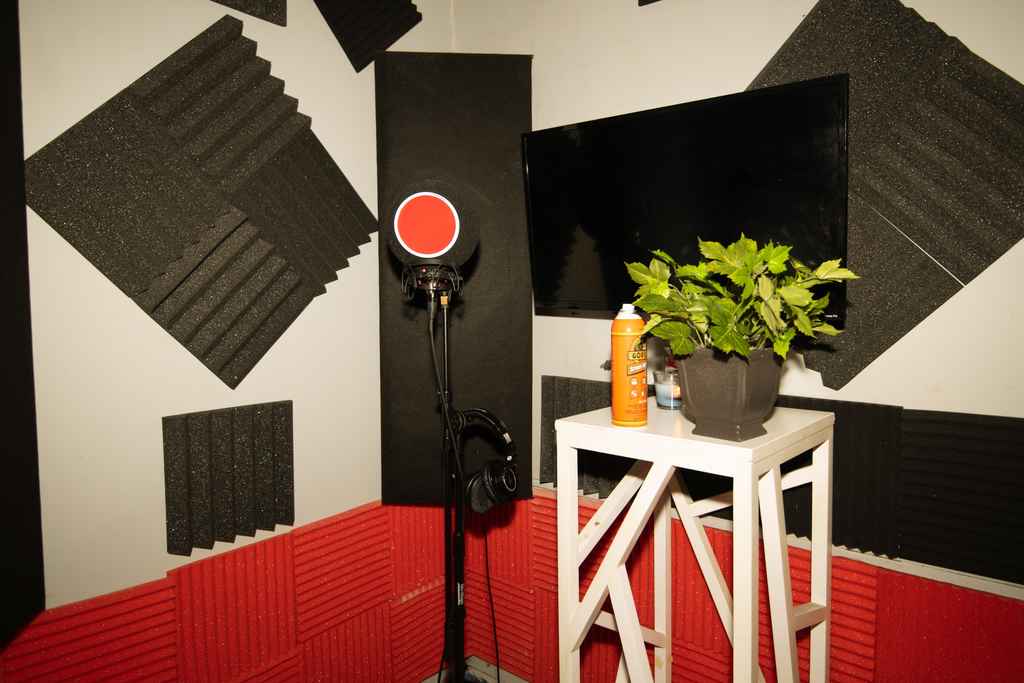
You can fashion a recording studio out of any quiet room in your house — as those who have previously recorded a podcast might already know. Since mics pick up a lot of background noise that can make the narration fuzzy, “quiet” really means “dead silent” in this case. Ideally, you won’t be able to hear the neighbors, your home appliances, or even your own movements in the recording.
Luckily, there are materials you can add to the room’s decor to dampen sound and absorb echoes — things like fabric, wool, or foam. For instance, a carpeted floor will always resound less than a bare one. Having thick curtains and foam tiles on the wall would also help. Finally, a smaller room may also decrease echoes and be easier to insulate, but make sure you have enough space to be comfortable and not knock things over. (Many authors choose to soundproof their closet and turn it into a studio.)
Renting a professional studio
If you don’t have a quiet room to insulate, finding a place to rent is a good alternative. Plenty of studios offer this service, charging by the hour for a professionally soundproofed and equipped studio. Depending on your location, it may cost about $30-$50 per hour for a basic room — note that this doesn’t come with an engineer, so you’ll have to bring someone who can help control the levels and hit record while you narrate.
If you’re planning to rent a studio, remember to budget for sufficient time:
- Professional narrators tend to take 2-3 hours to record 10,000 words in a manuscript;
- Nonprofessionals might take around 4-5 hours for the same amount.
Say your manuscript is 50,000 words long. It will take 20-25 hours for you to read everything. This means your studio rental fees for this self-recorded project might fall into the $800-$1,200 range.
For context, Findaway estimates that complete audiobook services for a manuscript of this length (including everything from the narration to the sound engineering) would cost you $1,300-$1,600. So while renting a studio and recording your audiobook yourself might sound fun, it won’t necessarily save you much money, especially if you’re aiming for quality.
FREE COURSE
Audiobook 101
Learn to create a professional audiobook and stand out in a growing market.
3. Acquire quality sound equipment
Next up, we have equipment. The tools you pick will not only affect your audiobook’s quality but also the ease with which you work. The essential tools you’ll need are:
- A computer;
- A microphone;
- A pair of headphones; and
- Audio recording software.
Computer 💻
You’ll need this to a) run the recording program and b) display your book so that it can be read on-screen, to avoid the noise of physical book pages. A laptop or iPad would also provide for a smooth reading experience. Whichever device(s) you choose, just make sure that it isn’t too noisy — some machines’ cooling systems are loud enough to create noisy distractions in your recording.
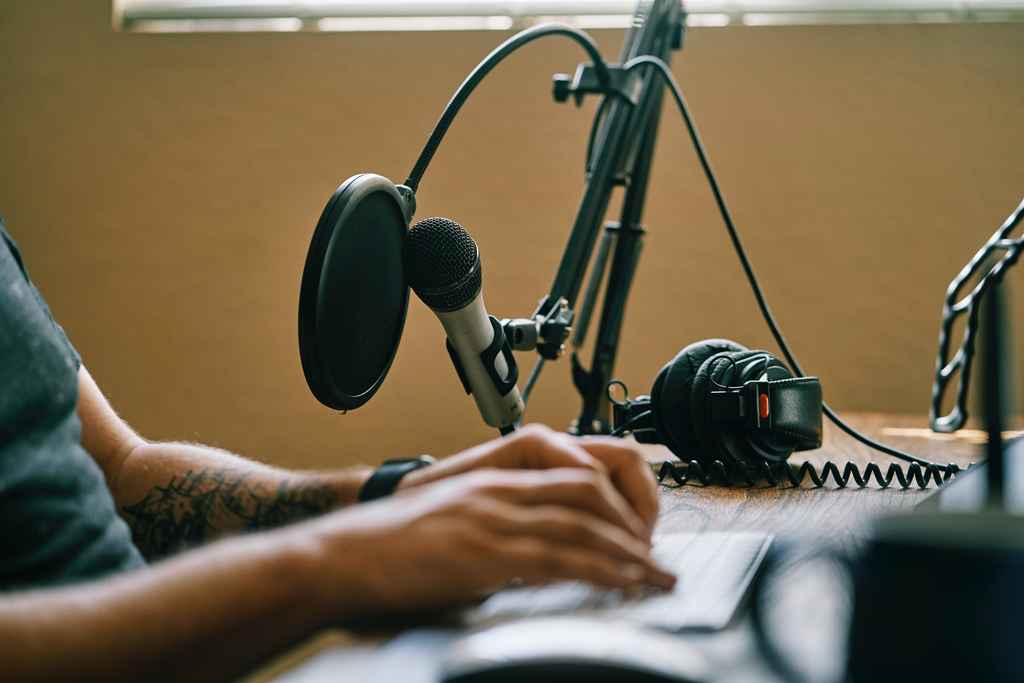
Microphone 🎤
Audiobook creators tend to prefer condenser mics rather than dynamic microphones since the former can pick up more delicate sounds. Other than that, there aren’t many requirements — though take note that a built-in microphone in a headset/earphones won’t be sophisticated enough to cancel out background noise. You also want the best possible recording so that when the audio files are compressed, they’ll still sound relatively rich.
A decent middle-of-the-road mic would cost around $100-$200 (the Blue Yeti is a good option, with an easy-to-use manual and a USB connection). You can also invest in an attachable pop filter ($10-$30) as another net to catch all the plosive sounds that can make your recording peak at inopportune moments. Alternatively, you can rent a microphone set from a local audio shop for about $30-$40 a day.
Headphones 🎧
Headphones will help you better gauge the quality of your audio as you record and avoid any potential feedback from your computer. No fuss here, as you’re not working with multiple sound sources — just a reasonable pair of over-the-ear headphones will do.
Audio recording software 💽
Finally, you need software to process and edit your recordings. Professionals like to use programs like Adobe Audition and Pro Tools. Still, for your audiobook recording purposes — especially the first time around — your software doesn’t have to be advanced or expensive. We suggest one of two (free!) applications: GarageBand or Audacity.
If you’re using a Mac, GarageBand is a free audio workstation that comes preloaded on your computer. If it’s not, you can easily install it from the App Store at no cost. The app has basic features to record, cut, and roughly edit your audio files, and its interface is easier to navigate than that of software built for the pros. You’ll still need to put in some time to get used to the functions and tabs of the app, but it’s not overwhelming.
For PC users, there’s the audio editing tool Audacity. It offers fewer functions than GarageBand, but you can install some plugins to access the entire catalog of tools needed to engineer your soundtracks. We’ll cover this in more detail later because now, we’re moving on to the fun part: actually narrating your book!
4. Record the audiobook
This step is pretty straightforward: you’ll narrate each of your chapters in a separate file, pausing at the beginning of each chapter to establish it, and store them in a folder. You’ll also need to record the opening and closing credits (including the title, your name as the author and narrator, and the book’s dedication or acknowledgments). This will take a while and inevitably start to get pretty tiring. To help your record go off with as few hitches as possible, here are five top narration tips.
Read out loud before recording 🗣
Yes, you wrote the book and know what’ll come up next, but are you ready to narrate those details flawlessly and with the appropriate emotions? As with revising your book, reading the text aloud helps you identify optimal execution before you get it on tape.
To keep yourself from tripping over sentences in the studio, read the chapter you’re about to record out loud at least once before you start. You can even make a note to add punctuation in certain places so that the sentence runs smoother. Then, practice difficult words or phrases a few times — this will help you tremendously when you turn your mic on!
Record a demo 🎼
As another safeguard, start by recording a demo and exporting the file to ensure that everything works well tech-wise. Listen to that demo and share it with someone else — preferably someone with audiobook recording experience — and see what they think. Touch on topics like volume, pacing, emotions, and note down adjustments for the actual recording.
Avoid dairy and spicy food — and drink lots of water 💧
Foods with high fat and/or spice levels tend to linger around your throat and hinder clear enunciation. Large meals may also cause burps or heartburn, which similarly disrupt your narrating flow. In the run-up to your recording days, avoid these kinds of food to protect your voice.
Also, this should go without saying, but keep yourself hydrated as you’re narrating! You don’t want a parched and sore throat at the end of the session, especially since you might be back in the studio again the next day.
Limit each session to 2-3 hours ⌚️
On the note of protecting your voice, remember to avoid overworking it. It’s tempting to forge ahead and record as much as possible, especially if you’re renting by the day, but we recommend spending no more than three hours in the studio at a time. After that, your voice might start sounding tired, and you're more susceptible to making mistakes. Either take a break or call it a day — let your voice relax and recuperate before jumping back in.
Have a dedicated sound marker for mistakes ⚠️
Here’s a pro tip to save your audio-editing self from excess work: when you’re speaking, and you make a mistake, pause, make a specific, loud sound like “oops!” and then start the sentence over. On the dashboard of your editing software, the “oops!” will stand out because of its frequency, which means you can notice it faster when you edit — and this takes us to our next step.
5. Check the narration in the recordings
Once you’ve got your first recording, it’s time to listen again, refine the audio, and ensure all the technical requirements are met! While GarageBand and Audacity have limited functionalities and can only take you so far without professional help, they do offer the essential tools to help your audiobook meet technical standards — and here’s how to do that.
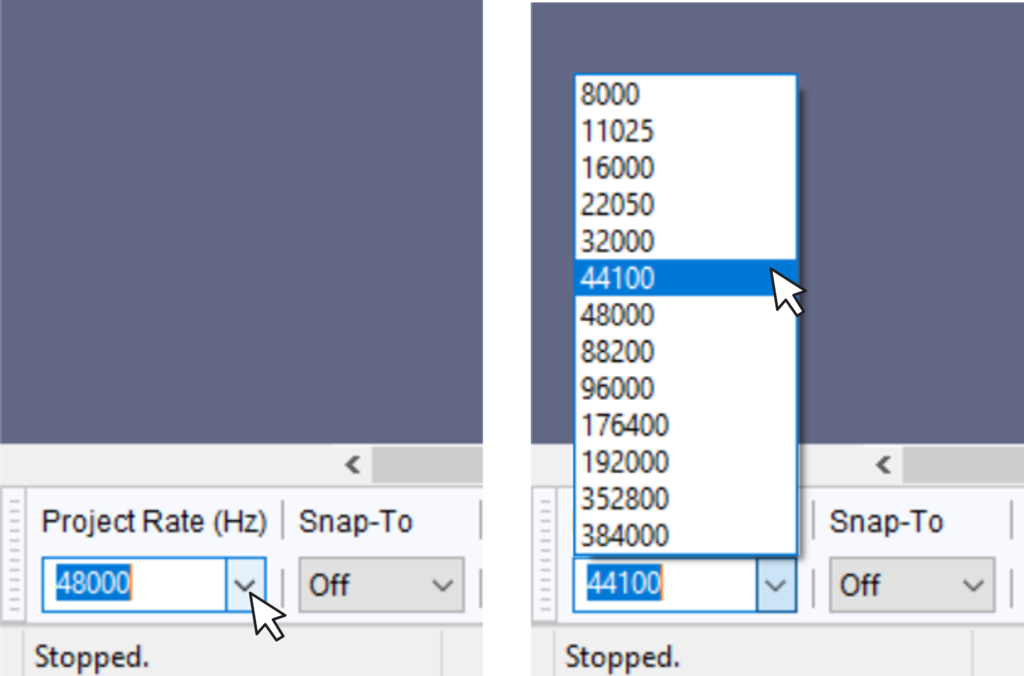
Check your sampling rate
The sampling rate is the frequency at which the audio is recorded; aggregators ask for a rate of 41kHz. On both GarageBand and Audacity, this is the default setting, but check before you begin just in case your hardware equipment causes any changes when you plug them in.
Pro-tip: If you’re struggling with the interface of the app, there are plenty of Youtube videos that will walk you through every little detail.
Set boundaries for the volume
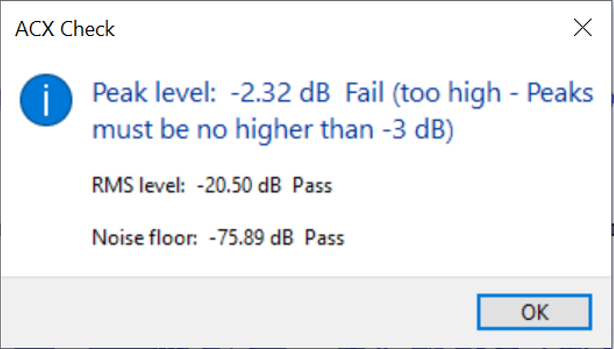
The next requirement is that the volume of your audio files must fall in a certain range: the average loudness has to be between -23dB and -18dB RMS, and the peak value cannot be greater than -3dB. Basically, you need to keep the average loudness within a set range. At the same time, any singular or momentary emphasis (i.e., a scene in which a character screams) can exceed that range, but only up to a certain point.
With GarageBand, the plugins for these adjustments are already available. To pick the RMS range and peak value, use the Compressor plugin in the Master tab at the bottom of your screen.
With Audacity, you’ll need to install an RMS Normalizer plugin to stabilize the volume. It shouldn’t cost you any money — you just have to add it via the plugin tab on the dashboard.
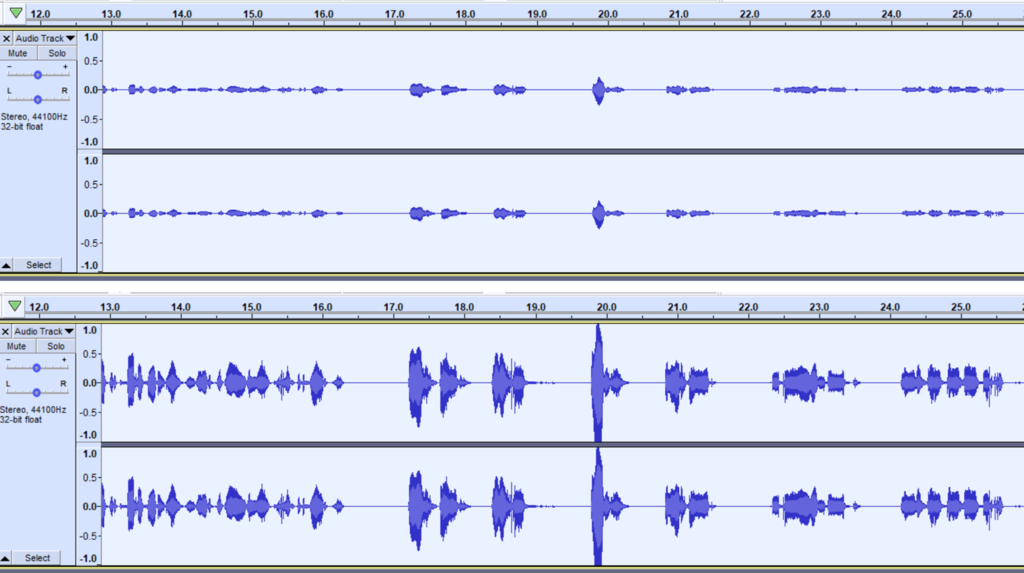
Eliminate “mouth sounds” and audio gaps
Even if you have a pop filter, mouth sounds like the p-pop or clicks can still slip into your recording. GarageBand’s plugins include options particular to narration voice, which you might want to check out (see this Youtube tutorial).
Audacity even has an audiobook editing manual for you to refer to. There’s also a free ACX Check plugin on this app, which will analyze your files and verify they meet the standard requirements.
You’ll also have moments when you stop to take a breath, make those “oops!” mistakes that we mentioned earlier, or fumble over something — those should be cut out, too.
As you can imagine, sound engineering your audiobook can cause some real headaches. Working with a professional sound technician can save you time and elevate the quality of your recordings. So while narrating your own book is a great way to add a personal touch to your writing, the technicalities are best left to professionals.
6. Upload your audio files to ACX or a similar audiobook platform
Once the editing is finished, you’re ready for the final step: exporting and uploading your hard work onto ACX, Findaway, or other distributors. When exporting the files, remember to choose the high-quality compression option (192 kbps). Then, you can upload all parts of the audiobook, which includes:
- The opening credit;
- Each of the chapters;
- The closing credit;
- A sample (a clip of 1-5 minutes for readers to try out before they choose to buy your book); and
- An audiobook cover (which will have square dimensions, unlike your average design for a book cover).
Most audiobook aggregators require chapter files to be named by their number and title (if available), separated by a colon. The text for the name should also be capitalized per the Chicago Manual of Style (i.e. ‘Chapter 3: Castle of Hearts’). There are some minor differences between naming conventions on each platform, so remember to check out the appropriate guidelines before uploading.
For the sample, you can pick any part of the main text itself — not the opening credit — as long as it doesn’t cover explicit material.
And there you have it: your very own, DIY audiobook!
If you want to try and leverage new technology to try and achieve similar results with less hassle (and for less money), head on over to our next post on AI audiobook narration.