Last updated on Apr 27, 2022
How to Format a Book Manuscript (+ Template)
About the author
Reedsy's editorial team is a diverse group of industry experts devoted to helping authors write and publish beautiful books.
More about the Reedsy Editorial Team →Martin Cavannagh
Head of Content at Reedsy, Martin has spent over eight years helping writers turn their ambitions into reality. As a voice in the indie publishing space, he has written for a number of outlets and spoken at conferences, including the 2024 Writers Summit at the London Book Fair.
View profile →When submitting your book to agents or publishers, you should always check the relevant submission guidelines, but the requirements for manuscript format are broadly the same.
A manuscript format should feature letter or A4 page size, 12-pt Times New Roman (or similar) font, 1” margins, double-spaced lines, and 0.5” paragraph indents. As well as formatting your document correctly, you'll also need a title page, page numbers, and a header.
With the help of Reedsy editor Chersti Nieveen, we’re here to walk you through the whole process. Here's how you should format a book manuscript:
1. Name your manuscript file
Before you start typing anything, open up your word processor, create a new document, and SAVE the document.
Give it a file name that sounds professional and is easy to search for. Agents and publishers have a lot of manuscripts to look at so they’ll most likely be searching for your manuscript on their hard drive with only some part of your name or book title in mind. As such, name your files with those details plus the date that you’re submitting the manuscript. That way, if you’ve got multiple copies saved on your hard drive, you know which version you actually sent off.
Lastname_TITLE_date.docx
Use underscores to separate the words in the file name — this prevents it from being garbled when the spaces get translated as “%20” by some systems.
File Format
The standard file used in publishing is .docx or .doc. Both are native to Microsoft Word and compatible with all mainstream word processors, including Google Docs.
If you don't want to go through the trouble of setting up your document from scratch, just download our free template:
FREE RESOURCE
Manuscript Format Template
Get your manuscript ready for submission to agents and publishers.
2. Use 1-inch margins for the manuscript format
 Click File > Page Setup and let’s get your paper settings in order.
Unless otherwise stated in the submission guidelines, use:
- Letter Size (8.5” x 11”) format for the US and Canada; and
- A4 (210 x 297mm) format for most other territories.
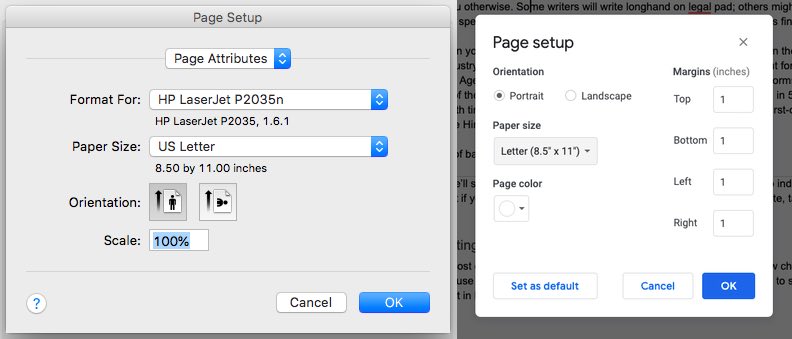
Set one-inch margins on all four sides. This should already be the default setting on both Word and Google Docs. Some writers will tinker with the margin settings in an attempt to hide their manuscript’s true word count. Professionals can spot this straight away, so don’t do it.
A quick disclaimer before we go any further: some of these steps will look slightly different if you’re using Microsoft Word on Windows rather than iOS, as demonstrated in this post. For example, where on iOS you’ll see ‘Format’ or ‘File’, you’ll see ‘Layout’ on Windows.
3. Use Times New Roman font
Some editors and agents will prefer sans serif fonts (ones without the curly flourishes) but unless specified by the submission guidelines, stick to good old-fashioned Times New Roman.
Note: if you're looking to self-publish your book, you can just go straight to formatting your final book file. Use Reedsy's free formatting tool for cost-free professional results.
4. Double space the book manuscript
Your lines should be double-spaced, and there should be no extra line breaks between paragraphs. This is how you can change those settings:
- MS Word: Format → Paragraph → Spacing: Double.
- Google Docs: Format → Line & paragraph spacing: Double.
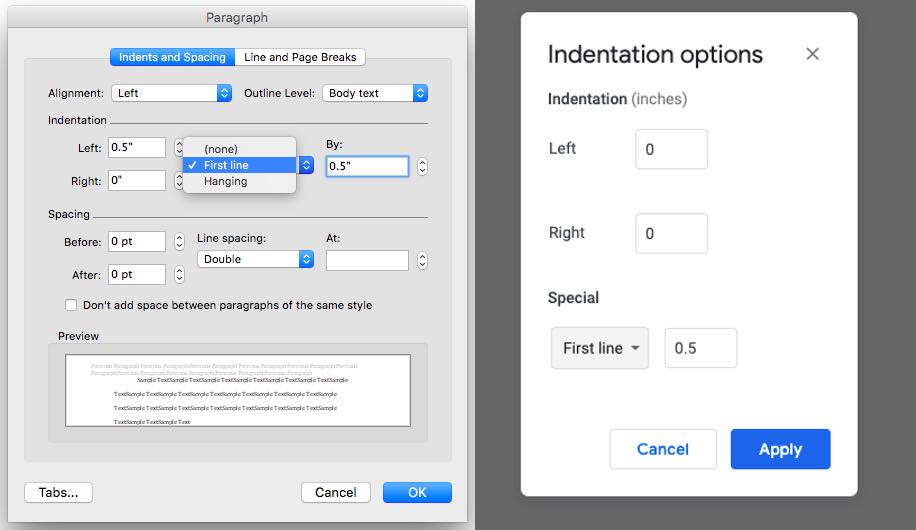
Each new paragraph (and each new portion of dialogue) should start with an indentation. The exception would be the start of a new chapter or scene. Instead of hitting ‘tab’ every paragraph, you can set this up as the default.
- MS Word: Format → Paragraph → Indentation → Left: 0.5” → Special: First line.
- Google Docs: Format → Align & indent → Indentation options → Special: First line → 0.5”.
5. Insert a header
Each page should have a header with your surname, the book title, and the page number in ALL CAPS with this standard format:
SURNAME/TITLE/PAGE #
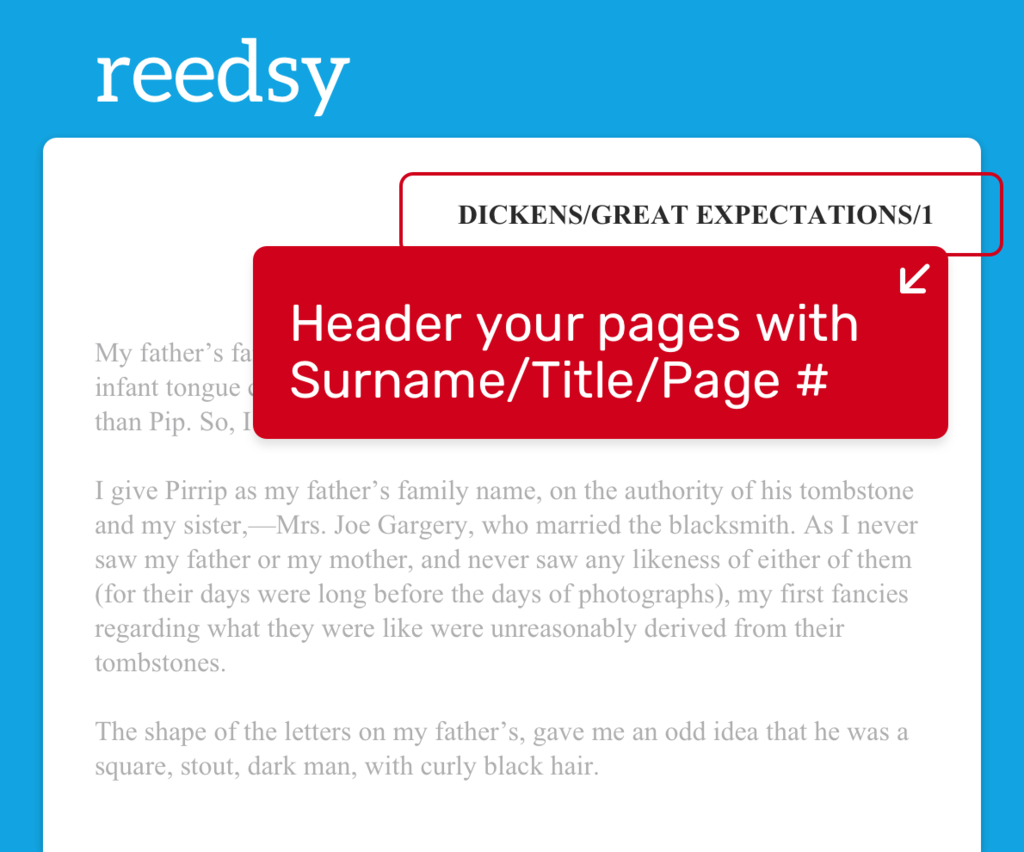 If your title is longer than three words, abbreviate it by choosing a few keywords. For example, the first page of The Curious Incident of the Dog in the Night-Time would have the following as the header:
HADDON/CURIOUS INCIDENT/1
Here’s how you can format your document so that these automatically appear on each page.
In Microsoft Word:
- Insert → Page Number → Position: Top of Page → Alignment: Right → Uncheck “Show number on first page.” Then click Page Number → Format Page Numbers…→ Start at: 0
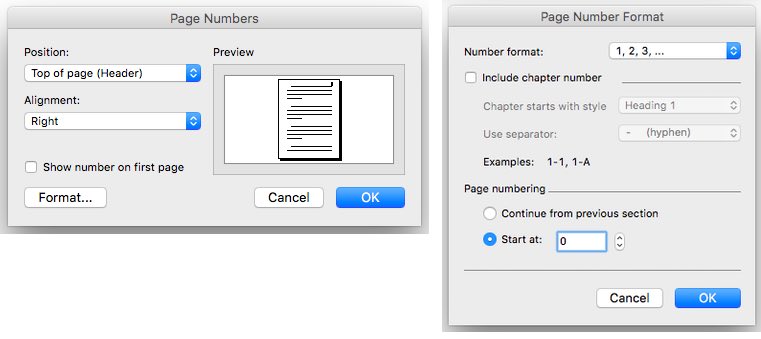
- Then double-click at the top of your page 1 to add your surname and book title. Align Right to match the page number.
In Google Docs:
- Insert → Page numbers → [the icon showing page numbers on the top right, starting with the second page]
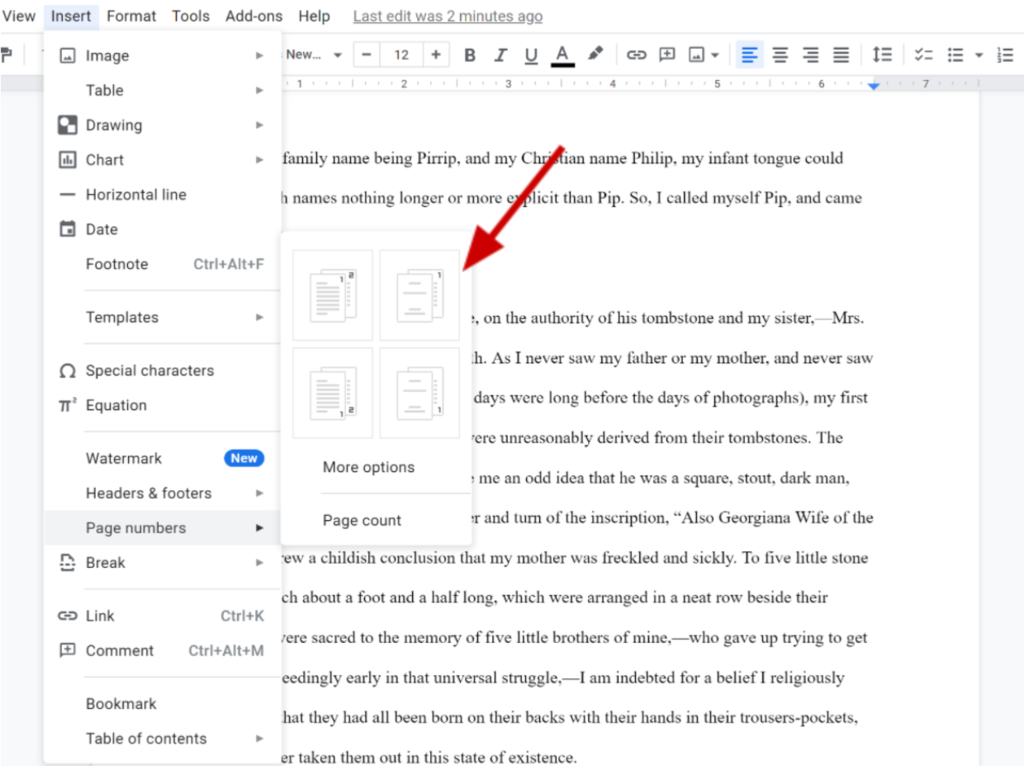
- Add your name and title as you’d do with the MS Word document.
You don’t want to count your title page as “PAGE 1” of your manuscript, which is why you have to choose the ‘different first page’ option.
With your document all set up, now you’re ready to work on the content of your manuscript.
6. Create the title page
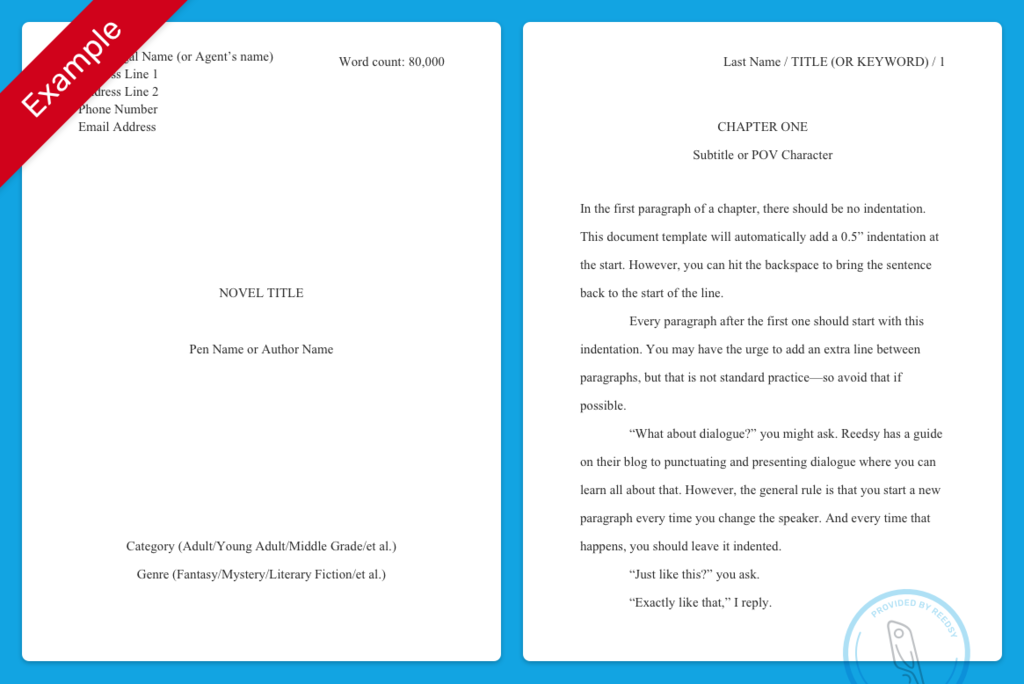
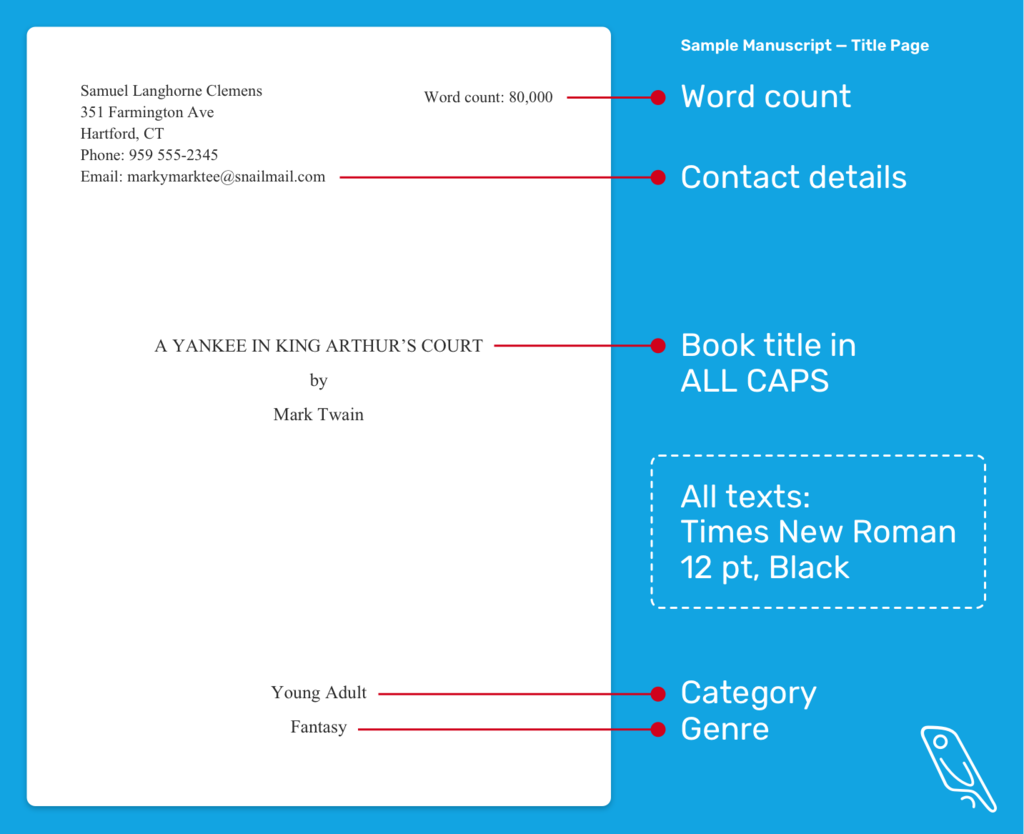
Before we get into Chapter One, take a moment to set up your title page. All text should be in 12pt Times New Roman, black — just like the rest of your manuscript.
Contact Details
In the top left-hand corner of the title page, list your legal name and your contact details (including email address and phone number).
If you already have an agent, you should list their name and contact information instead.
Word Count
In the top right-hand corner, list your word count to the nearest thousand.
Title and Author Name
In the center of the page, write your book title in ALL CAPS. Two lines below this, write your author name — this can be the same as your legal name, or a pen name (also known as a nom de plume) that you’ve decided to use in your creative life.
Category and Genre
Centered at the bottom of the page, list the category and the genre of your book. Category usually refers to the age group of the intended reader: Adult, Young Adult, Middle Grade, Chapter Book, Picture Book, et al.
You may feel that your book belongs to many genres, but listing too many will make agents and editors despair. If you’re at a loss, try to think of the section of a bookstore where you’d imagine your work being shelved.
Note: your manuscript should not feature most of the things found in a book's front matter: dedications, copyright pages, etc.
Okay, now that you’ve tidied your manuscript around the edges, let’s do what we came here to do and format the actual content of your book.
7. Add page breaks for each chapter
When you kick off a new chapter, start it on a fresh page (Insert > Page Break). Hit the enter key so that you’re about a third of the way down the page, and enter the chapter number in ALL CAPS with center alignment:
CHAPTER ONE (or CHAPTER 1)
If your chapter has a subtitle — which might be the chapter title itself, or the name of the POV character — enter that directly below:
CHAPTER FOUR
The Man from Okinawa
If you wish to indicate that there is a significant time gap between chapters, then enter that two lines above the chapter heading. For example:
Three years later
CHAPTER 10
‘P’ is for Psycho
Chapter breaks
Chapter breaks are often used to indicate a time dash or a switch of POV characters. Some authors may skip to another location or scene with a new paragraph — but this can often confuse the reader. If you want there to be no doubt that you’re jumping to a new scene, you can use a chapter break — indicated by a hash/pound sign (#) or three spaced asterisks (* * *).
8. Proofread your work
If you want to make sure you get every last detail of your book manuscript format right, it’s worth investing in a copy of the Chicago Manual of Style — the gold standard for publishing in the US. However, you can acquit yourself pretty well just by reading this guide on punctuating dialogue and following these suggestions:
- Never use ALL CAPS in dialogue — if your character is shouting or angry, it’s better to show this through their actual words, rather than how they’re formatted;
- Never use underlining in your manuscript;
- Only use a single space after periods/full stops in line with the AP Stylebook and Chicago Manual of Style.
Really, this advice applies to your manuscript as a whole, not just dialogue. If you’re set on getting everything exactly right, you can always hire a copy editor to polish your manuscript for you before you send it out — though we’d only really advise this if you’re also unsure about how your prose is reading as a whole.
9. Finish formatting the manuscript with ‘The End’
It might sound like ridiculous advice, but don’t forget to write ‘The End’ at the end of your manuscript! This way, if your book has an ambiguous or surprising ending, the reader won’t think they’re accidentally missing the final few pages.
We mentioned it in the introduction, but it bears repeating here, too: always follow submission guidelines! If you submit your manuscript to an agency or publisher, they will likely have their guidelines on their website. Read them and follow them to a tee — even if it conflicts with what we’ve said in this post. But if there aren’t any specific requirements, we’re pretty confident that this format will keep you in the clear.
Hire an expert book typesetter
Daniel P.
Available to hire
I love books, and I want to help with yours! After 15+ years and 100s of projects, I know what it takes to make your book look its best!
My Lan K.
Available to hire
I am a book cover artist with a wide range of styles and who loves anything fantasy and whimsical.
Lorna R.
Available to hire
I am a professional book formatter/interior designer who enjoys working in all genres, from fantasy and sci-fi to romance and YA fiction.
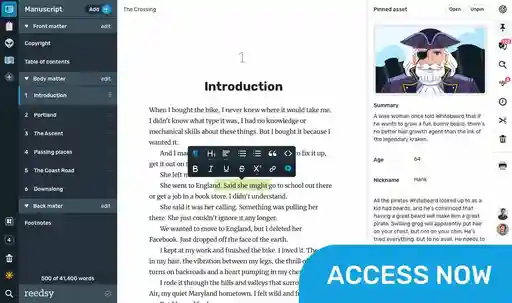
And if you’re looking to self-publish right away, just put your masterpiece directly into Reedsy Studio, our free, web-based writing and formatting tool that offers free book templates. It’ll turn out a beautifully typeset book and convert it into any file format you might need, whether that be a print book or an ebook.
Best of luck getting published, and see you on the shelves!




11 responses
Claerwen Howie says:
21/09/2019 – 08:14
Most useful. Especially interesting for me was having only a single space after a full stop. Years of university training required a double space. A worthwhile blog. Many thanks.
Pauline Dewberry says:
03/10/2019 – 18:13
This is absolutely great. Thank you so much for all this invaluable information. I thought I'd finished my manuscript but can tell from reading this post that I need to edit it a bit more! Thank you.
Susan Inwood says:
10/10/2019 – 17:56
Is there an inexpensive service that can do the formatting for us?
↪️ Martin Cavannagh replied:
15/10/2019 – 14:26
Well actually yes! Reedsy has a free formatting tool that you can access when you sign up (also free). You can read more about it right here: https://blog.reedsy.com/how-to-format-a-book/
Stephen Maloney says:
23/10/2019 – 15:25
Can I use section breaks in Word document in order to create different footers? Will this effect conversion to ebook format? I wanted the chapter name to appear at bottom right with page numbers
↪️ Martin Cavannagh replied:
25/10/2019 – 10:27
Section breaks are not ideal. MS word (and all other word processors) will have footer functions that are automatic and easy to implement. The danger with using section breaks is if you start editing any portion of your book, those footnotes will eventually end up on the wrong page. In either case, it won't affect your ebook conversion... as you really shouldn't be using MS word to format ebook file anyway :)
Mystic says:
14/11/2019 – 23:08
Man, I'm trying to figure out how to do some of this in LibreOffice and it isn't easy. Otherwise, this was a great article!!
Mark Tomlinson says:
12/02/2020 – 23:27
Thanks! I'd love to see the Reedsy book editor export to this format.
Nikolai Feinstein says:
21/02/2020 – 05:32
Thank you for all the help! However, I did have a few questions: 1.) Would a "Dedication Page" go on the manuscript? Or will the whole dedication of the book be figured out when I am "deeper" into the process of having my book published? 2.) For my book, I have a *KINDA* subtitle to the book's main title, I would, honestly, consider it more of a "motto" to the story I want to tell; would that go ANYWHERE on the manuscript? Or just like the dedication, would it be decided upon when I am deeper into the publishing of my book?
↪️ Martin Cavannagh replied:
21/02/2020 – 09:45
The thing with this kind of manuscript is that the only people who will ever read it are people in the publishing industry. If you want a subtitle or add a dedication page, that discussion can take place much, much later. I wouldn't sweat putting those in their... unless you think their inclusion is crucial to understanding/enjoying the manuscript.
Marian says:
21/02/2020 – 22:17
How is formatting different for a self help book?